Setting up and configuring your first GEODNET device can be a bit daunting if you're new to the ecosystem. That's why we've put together this guide to help you through the process. By following these instructions, you'll be well on your way to connecting your device to the GEODNET platform and accessing its benefits.
Step 1: Purchase the GEODNET Space Miner
Mapping Network offers MobileCM Space Weather Station Miner Dual-Band and Tri-Band versions. You can view the GEODNET section here.
Step 2: Unbox and Gather the Components
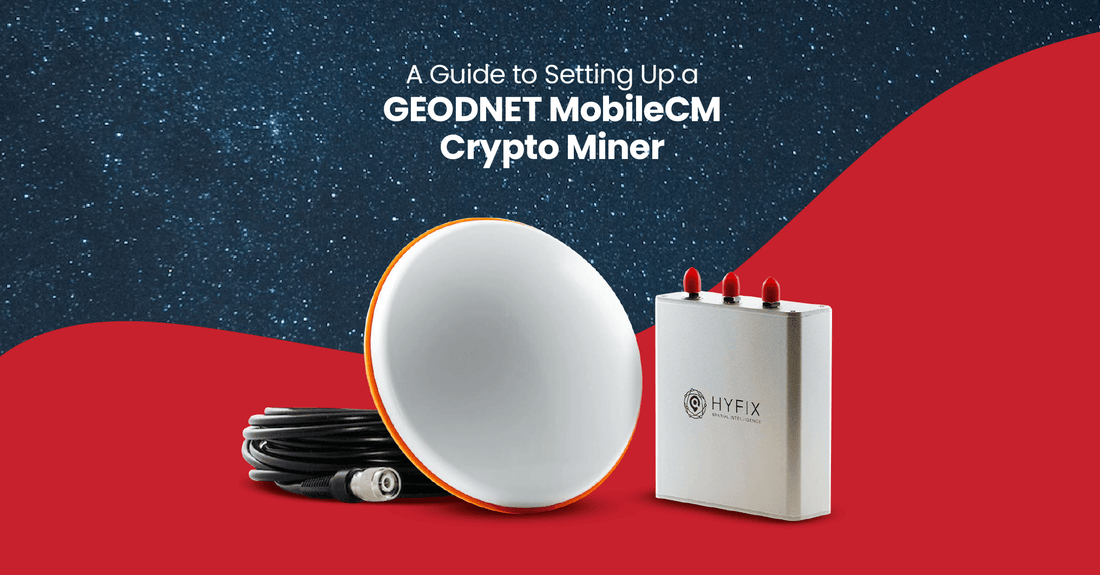
Once your MobileCM Crypto Miner arrives, it's time to unbox and gather the components. Inside the package, you'll find the MobileCM crypto miner, power cord, satellite antenna, Wi-Fi antenna, mounting pole, and fasteners.
Step 3: Connect the Cables and Antennas to the Miner
Connecting the cables and antennas to the miner is easy. Begin by plugging in the power cable, which is a USB cable, and powering it with any USB charger with at least 1 amp. You can use a regular phone charger for this.
Next, connect the Wi-Fi antenna to the "Wi-Fi BT" input on the back of the miner. Remove the red plastic cap from the input and connect the antenna. Similarly, remove the red plastic cap from the "GNSS" input and connect the smaller end of the satellite antenna cable. The other end of the cable should be connected to the satellite antenna.
Make sure that the antenna is mounted on the pole and secured firmly to avoid movement in harsh winds. For best results, position the satellite antenna with a clear 10° line of uninterrupted sight to the sky.
Step 4: Connect Your Phone to the Miner's Wi-Fi
To configure your MobileCM Crypto Miner, you'll need to connect your phone to the miner's Wi-Fi. Go to your phone's settings and networks, and connect to your miner called "mobileCM". For the password, enter the serial number that is on the back of your miner. If you're having trouble connecting, try resetting the miner or moving closer to the device.
Step 5: Configure the Miner
With your phone connected to the miner's Wi-Fi, you can now configure the device. Open a web browser on your phone and type in the following address: 192.168.4.1. You might have to connect to the miner a few times and refresh the web browser a few times, but after a few attempts, the page should pop up.
In the "Configuration" tab, fill in the network name of your Wi-Fi under "SSID". Note that it cannot be the 5 GHz Wi-Fi but should be the 2.4 GHz. In the "Password" field, enter the password for your Wi-Fi. In the "Miner Key" field, enter the serial number on your miner. Click "Save and Reboot".
After a few seconds, the green flashing light should go from flashing to solid green, indicating that the miner has connected to your Wi-Fi.
Step 6: Configure the Miner's Password
For security reasons, it's important to change the default password on your MobileCM Crypto Miner. To do this, access your router settings and find the miner device named "espressif". Copy its IP address and enter it into your browser. Type in your miner serial number, then click "Configuration". Erase the autofilled miner key and type in a password between 12 to 18 letters or numbers with no spaces or special signs. Make sure to write down your password on a piece of paper. Click "Save and Reboot".
Step 7: Create a GEODNET Account
Now that your MobileCM Crypto Miner is configured, you need to create a GEODNET account to start mining. Go to console.geonet.com and click "Sign up" to create an account. Follow the prompts to provide your email address, create a password, and verify your account.
Once you've verified your account, log in to the GEODNET console and click "Mine" in the top menu bar. Then click "Add Miner" and enter your miner's serial number and the password you created for your miner.
Step 8: Add Polygon Wallet
To add your Polygon wallet to the GEODNET console, click "Settings" in the top menu bar and then click "Wallet". Paste your Polygon wallet address into the "Wallet Address" field and click "Save".
To receive your tokens, you need to provide a Polygon wallet address. If you don't have a Polygon wallet, you can create one using a service like MetaMask or Trust Wallet. Once you have a Polygon wallet, copy your wallet address and paste it into the "Wallet" field under "Token Issuance".
Step 9: Check Your Earnings
It may take up to a day for the GEODNET server to recognize your miner. Once your miner is recognized, you can check your earnings by clicking "Token Issuance" under "Mine" in the GEODNET console. Here, you'll see the tokens that you've earned through mining.
Note that it may take a day or two before you start to see your earnings in your wallet. Be patient and keep mining to increase your earnings.
Congratulations! You've successfully set up your MobileCM Crypto Miner and created a GEODNET account. With your miner connected and your Polygon wallet set up, you're now ready to start mining and earning tokens. Keep your miner powered on and connected to the internet to maximize your earnings. Good luck!